
Video · Practical guide
Conference video: LED screens, recording and streaming at one event
A presentation may need slides in the room, cameras for remote viewers and a recording for editing afterward. Define those requirements together, with the event program at hand. The example in this guide helps coordinate content, signals and operation; it is not a completed installation or a finalized configuration.
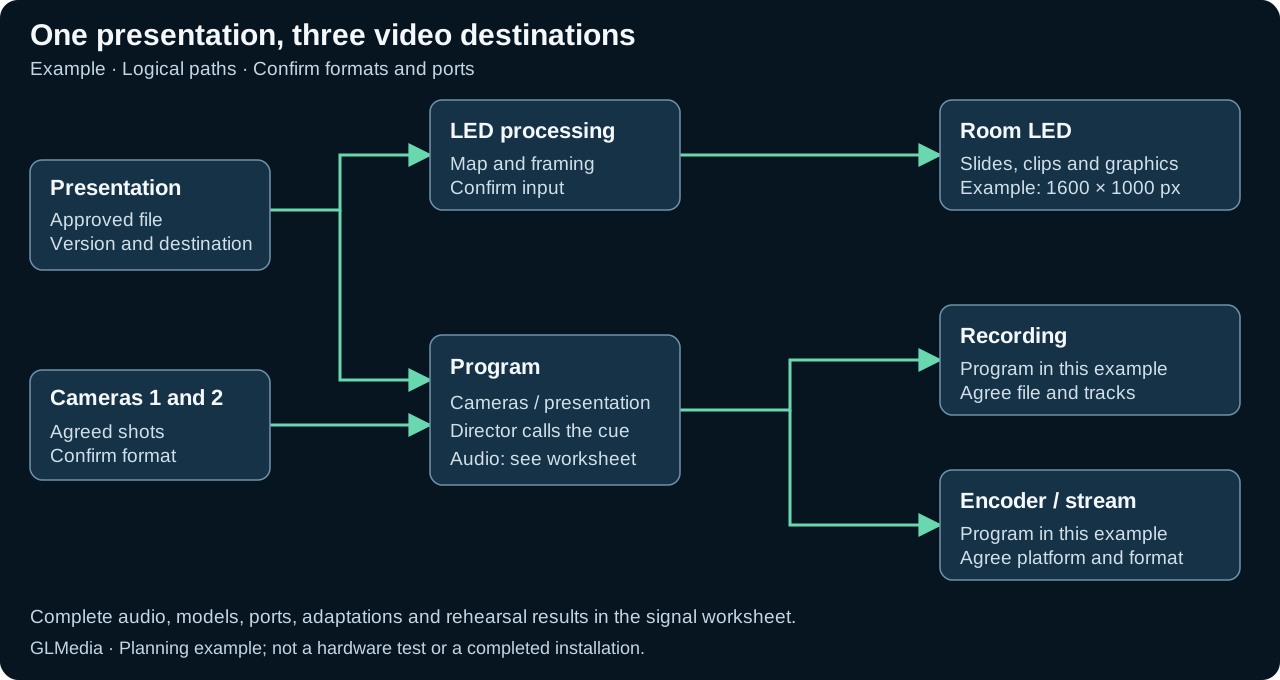
Define the result for each destination
Ask what people seated in the room should see and what remote viewers need. Also agree on the files to be delivered afterward: the final program, individual camera recordings, slides or a combination.
This example has one room, one presentation, slides, clips, graphics and two cameras. The presentation feeds the LED wall, while the recording and streaming program switches between cameras and presentation content. That is a choice for this example; change it if the room needs live camera images on screen or different coverage.
Use a table everyone can review
The table below describes logical destinations. Before setup, fill in ports, adaptations and formats for the selected models. A line in the diagram does not confirm that a device has the connection shown.
The example LED canvas is 1600 × 1000 pixels. This teaching example comes from the LED content map (Spanish); it is not confirmed inventory. The processor input signal still needs to be agreed.
| Destination | Content in this example | Details to finalize | How to check |
|---|---|---|---|
| Room LED | Slides, clips and graphics; example canvas 1600 × 1000 px | Processor input, frame rate and framing | Read the most demanding table from the back and sides of the room |
| Recording | Program with cameras, slides, clips and graphics | Resolution, frame rate, codec, tracks and delivery | Open the saved take and listen to it |
| Live stream | The same program selected for recording | Platform format, account and audience | Watch and listen using an audience account |
Deliver files with a name and version
Deliver the approved file with titles, graphics and small text that let the team check readability. If there are different versions for LED and streaming, identify the destination in each file name. Use those same names in the worksheet and show rundown.
Record who can approve a change and the deadline for receiving materials. When an update arrives, confirm which version it replaces and check the received file. Keep a copy of the approved version so you can return to it.
Separate the pixel canvas, signal format and framing
The LED canvas describes the pixels used on the screen. In the signal-path worksheet, also record the resolution and frame rate of the signal reaching the processor. Ask the technician to confirm that combination in the model-specific manual.
Resolume Advanced Output lets you assign parts of a composition to different outputs and adjust the feed to the LED processor. Bring the project output map to rehearsal and compare its labels with the worksheet.
Decide who prepares the content and who calls the cue
For each program moment, identify what needs preparing and who confirms it can go live. If one person handles several tasks, agree on the sequence so they can rehearse it.
In OBS Studio Mode, you can prepare another scene in Preview and transition it to Program. Watch the destination receiving Program during the test: a prepared scene alone does not confirm what reaches the audience.
Include an audio worksheet with the video plan
List the speaker microphone, audience questions and clip audio. For each source, record what is heard in the room, what feeds the program and what must be kept in the recording. Confirm the mix with the audio lead.
If you add remote guests or languages, expand the diagram. Use the streaming (Spanish) and interpretation (Spanish) guides to check what each participant receives. The example diagram does not include those additional paths.
Check the recording while the stream is running
Rehearse the functions that will run together: camera switching, playback, recording and streaming. Save a short take, close it properly and open it in an application that can check the agreed tracks.
The OBS recording guide distinguishes recording and encoder settings; using options that differ from the stream can consume additional resources. Choose a configuration for your system and test it under the rehearsal workload.
Rehearse difficult transitions before doors open
Run a speaker entrance, a cut to slides, a clip with sound, a question and a break. Have one person watch the LED wall and another watch the stream, then review the recording. Record the program moment, destination and what happened.
Also test what each destination will show while a problem is being corrected. Agree on who makes the decision and what material is ready. Mark any untested path as outstanding in the worksheet.
| Moment | Example LED output | Program for recording and streaming | Confirmation |
|---|---|---|---|
| Entrance | Presentation title | Speaker camera | Show director confirms the start |
| Presentation | Approved slide | Slide or camera as directed | Operator confirms the file |
| Clip | Approved clip | Clip with agreed sound | Video and audio operators confirm the cue |
| Break | Holding graphic | Agreed holding graphic | Show director confirms the break and return |
Bring the worksheet to the technical meeting
Download the signal worksheet and fill in what you already know. It records destinations, formats, responsibilities, materials and test results. Include it with your request and the room plan.
To continue planning, see screens and content (Spanish), cameras (Spanish), recording (Spanish) and internet (Spanish). Use the same source and destination names throughout the worksheets.
Identify what changes in the picture
Before adjusting anything, save a clip of the problem. Note which camera and destination show it, whether the shot is static or moving, and what content is on the LED wall.
Brompton describes moiré as interference between the panel pixel grid and the sensor grid. It distinguishes this from sync and PWM artifacts; it does not propose correcting that spatial pattern in the processor.
| What you see | What to compare at rehearsal | What to record |
|---|---|---|
| Light or dark lines, static or moving | The same scene on every camera | Format, shutter, lighting and clip |
| Pattern that changes with framing | Wide shot, close-up and planned movement | Zoom, focus and person/camera positions |
| Different skin or logo colors | The same segment in the recording, monitor and LED wall | Paths, settings and affected destination |
Moiré: test every shot and the planned movement
Record the planned framing and the speaker’s movement, changing one variable per attempt. Note zoom, iris, focus and the camera-to-speaker and speaker-to-LED distances. Check both the face and the background: defocusing the LED can make text you need to retain unreadable.
On the HXC-FB80, check the focus-assist area (Spanish). If the detection area includes the background, the reading may be drawn away from the person. Check the person in the recorded image.
Compare banding and color at each destination
Save a sample from each camera and note its format, shutter setting and where bands appear. During rehearsal, change one control per attempt and compare the recording. On the FR7, check ECS and Flicker Reduce (Spanish). Test the other cameras separately.
If a face changes color only on the LED wall, first compare the same signal at the other destinations. For Tessera SX40/S8, the ChromaTune guide (Spanish) explains color-specific correction. Check logos and graphics too.
Make these comparisons off air. Keep the starting settings, change one condition per attempt and retain both clips. If an improvement harms another destination, note that difference before agreeing on the adjustment.
Use the camera-and-LED section of the signal worksheet. Assign each outstanding check to someone. To review paths and equipment with GLMedia, see video processing and cameras and streaming.
Audio ahead of the TV picture: compare the signal paths
Compare sound and picture at each destination before delaying a mix. If HDMI feeds a display and the analog outputs feed a recorder, measure and document those paths separately.
The television’s processing is one stage to check. Identify its model and available modes, and compare each part of the path. The total delay you observe is not a measurement of the converter’s latency.
The Blackmagic Converters manual, July 2024, pages 34–38 identifies the Mini Converter SDI to HDMI 6G outputs and internal paths. HDMI with embedded audio and the analog output allow separate monitoring paths; the diagram on page 38 helps identify which stage you are comparing. It does not provide a total delay for a particular TV or mixing setup.
Use the same visible and audible gesture in a rehearsal take. First check HDMI picture and sound together on the TV. Then identify the analog path and compare it against the same reference. Note where each result was observed and any other processing between the source and listening point. If the recording is aligned but the TV is late, investigate the TV branch before changing audio for every destination.
Use the monitoring and sync worksheet to record LED, recording and stream results separately. If the setup includes a scaler, also see the MD-HX/MD-LX converter guide (Spanish): Mini Converter 6G controls belong to that model and do not transfer to another converter.
| Comparison point | What to observe | Next step |
|---|---|---|
| TV via HDMI | Gesture and sound received together; TV model and mode. | If the issue occurs only there, investigate that branch using its exact manual. |
| 6G analog output | Selected pair, destination and monitoring processing. | Compare against the same reference signal; do not use another take. |
| Recorded file | Picture and sound in the file, separate from live monitoring. | Save the sample before changing a shared mix. |
| LED and live stream | Result at each destination and reception point. | Record separately; one aligned output does not validate the others. |
HDMI Instant Lock: testing switch 1 on the Mini Converter 6G
In the July 2024 manual, page 35, switch 1 controls HDMI Instant Lock on the Mini Converter SDI to HDMI 6G. It keeps HDMI output active when switching between inputs of the same video standard and can add picture and audio delay. Setting it to OFF avoids the delay added by that function; it does not demonstrate zero delay throughout the chain.
To compare, save the initial state and test ON/OFF off air with the source, format and destination unchanged. Repeat the visible and audible gesture in both states. Then check the planned source changes and whether the TV retains or recovers picture and sound. Record both sync and continuity: disabling a function that helps switching can change output behavior.
If the delay remains, identify the models and settings elsewhere in the path before trying another control. Hearing your own voice in a hybrid panel needs a separate check: it can be uncomfortable even when the program is aligned.
When planning video processing and distribution, add the listening and viewing points used for each comparison to the map. Record the configuration to be used at the event and the tests still outstanding.
Frequently asked questions
Do the LED wall and live stream have to show the same content?
They can show different content. Agree on what each audience needs before building the signal paths. In this example, the LED wall receives the presentation while the stream switches between cameras and presentation content, including clips and graphics.
Is the LED pixel canvas the processor input format?
They are different details. The canvas describes the LED pixel map; the input signal is confirmed against the processor and its configuration. Record both values in the worksheet to review framing and connections.
Does checking the LED wall also verify the recording?
No. Check each destination: save a rehearsal take and review picture and sound in the file as well as watching the room screen.
Does the worksheet already define which cables to order?
To order cables, complete the worksheet with confirmed models, ports, distances and adaptations. It organizes the paths; the technician must turn them into the actual connections for the setup.
What should I add to the map for a remote guest?
Add their incoming picture and audio and their return feeds. Then rehearse the connection and program changes with that person before the event.
How should I handle a last-minute presentation update?
Identify the file and destination, confirm who approves it and communicate which version it replaces. The operator must check the received material and update the worksheet.
Does someone need to watch the stream during rehearsal?
Assign someone to check the audience-side result. Their feedback should identify the program moment and what they saw or heard; compare it with the room screen and recording.
What information does GLMedia need to review this setup?
Send the date, venue, program, room plan, destinations, sample content and the deliverables you want afterward. Include the worksheet and flag equipment or formats that have not been decided.
Can a sync adjustment remove spatial moiré from an LED wall on camera?
No. Brompton describes spatial moiré as the interaction between the panel and sensor grids and distinguishes it from temporal artifacts. Check the camera, panel and framing; record banding separately to compare each issue.
Does opening the iris solve moiré for the entire presentation?
Check the speaker’s movement and every planned shot with that setting. Watch focus on the person and background readability: an improved shot does not validate the whole presentation. Save the take and note the conditions for comparison.
Should I copy one camera’s shutter setting to every other camera?
Test each unit with its own model, format and scene. Keep the take and setting associated with each camera.
What should I check if a face looks orange only on the LED wall?
Compare the same signal in the recording, monitor and LED wall before changing the camera. If you test color-specific correction in the processor, also check logos and graphics using those colors. Keep samples from each destination to compare the result.
Why can Mini Converter SDI to HDMI 6G analog audio seem ahead of the TV?
You are comparing different paths: the analog output feeds a listening point while HDMI passes through the television. The manual shows these paths and warns that HDMI Instant Lock can add picture and audio delay. First compare HDMI picture and sound together; then document the analog monitoring path, its processing and the TV model before delaying a shared mix.
Does setting HDMI Instant Lock to OFF remove all setup latency?
It avoids the delay added by that Mini Converter SDI to HDMI 6G function, according to page 35 of the manual. The other equipment in the path remains. Save the initial setting and compare ON/OFF with the source and format unchanged, then test the planned source changes. Record sync and TV picture/audio recovery without assuming OFF is best for every setup.
Sources and manuals
- Resolume — Advanced Output: output assignment and adjustment
- OBS — Overview, August 25, 2021: Studio Mode
- OBS — Standard Recording Output, May 26, 2023
- Brompton: technical article on artifacts, December 1, 2022
- Sony FR7: manual shutter adjustment
- Sony FR7: Shutter
- Sony FR7: Flicker Reduce
- Sony HXC-FB80: manual 4-734-401-52(1), pp. 32–33
- Brompton: ChromaTune, manual 3.5 Rev F
- Brompton: ChromaTune on SX40 and S8
- Blackmagic Design — Mini Converter SDI to HDMI 6G, Converters manual, July 2024, pp. 34–38: connectors, switch 1 HDMI Instant Lock and diagram; not total setup latency.